Booking Page
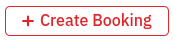
How to create booking
- Log into the dashboard
- Go to Booking menu
- Click + Create Booking
 button
*Status :
Pending Arrival ➝ when customer successfully make a booking.
Arrived ➝ when customer already come and dine in the restaurant.
Cancel ➝ when the booking was canceled.
No Show ➝ when the customer did not show up for the booking within 30 minutes after the booking time.
tutorial how to create booking https://t9003122396.p.clickup-attachments.com/t9003122396/f46d3545-8648-4558-84ff-70bde3bb1de8/create%20booking.webm?view=open
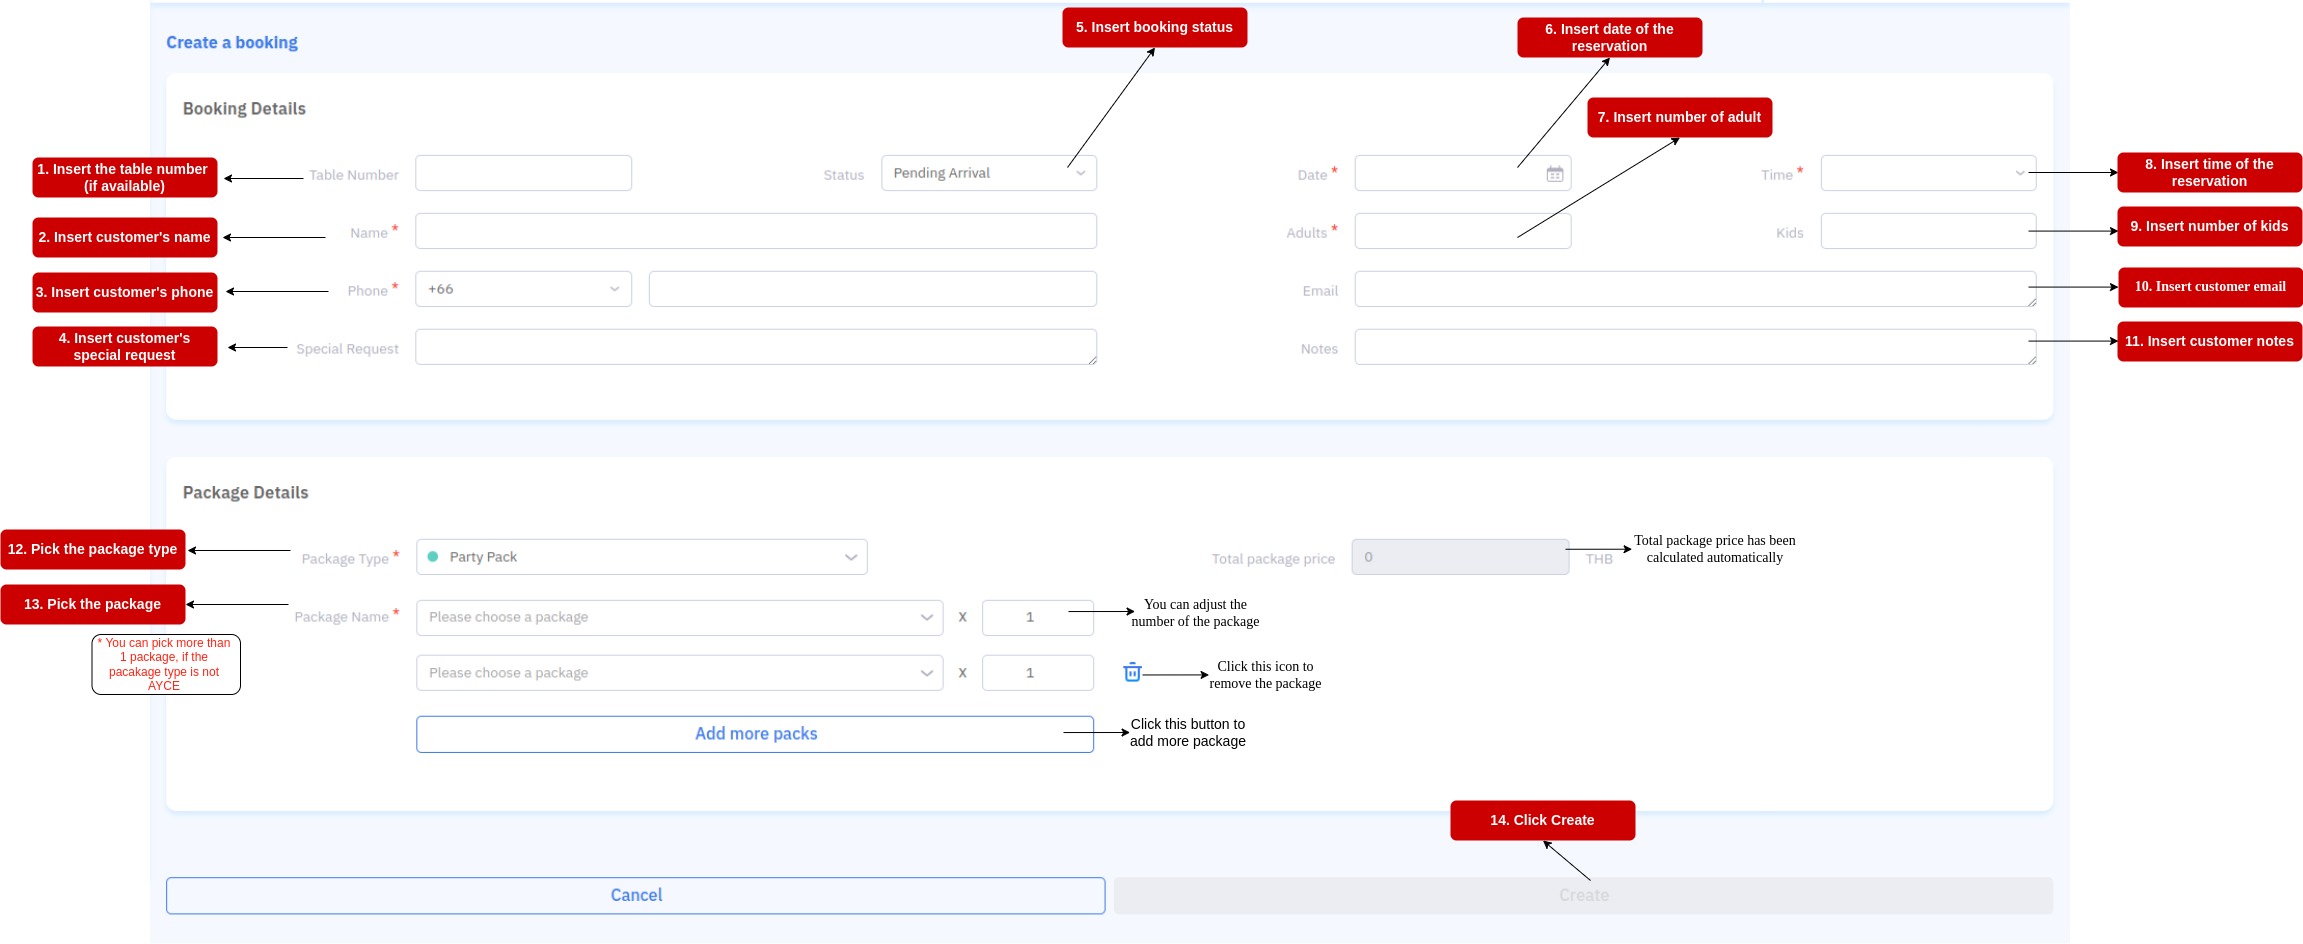
How to Export Booking List
- Log into the partner portal
- Go to Booking
- Press Export
- Pick the date type
- Set your start date and end date
- Type your email in and press Enter.
- Press submit and check your email (it may take up to 20 mins to generate the report)
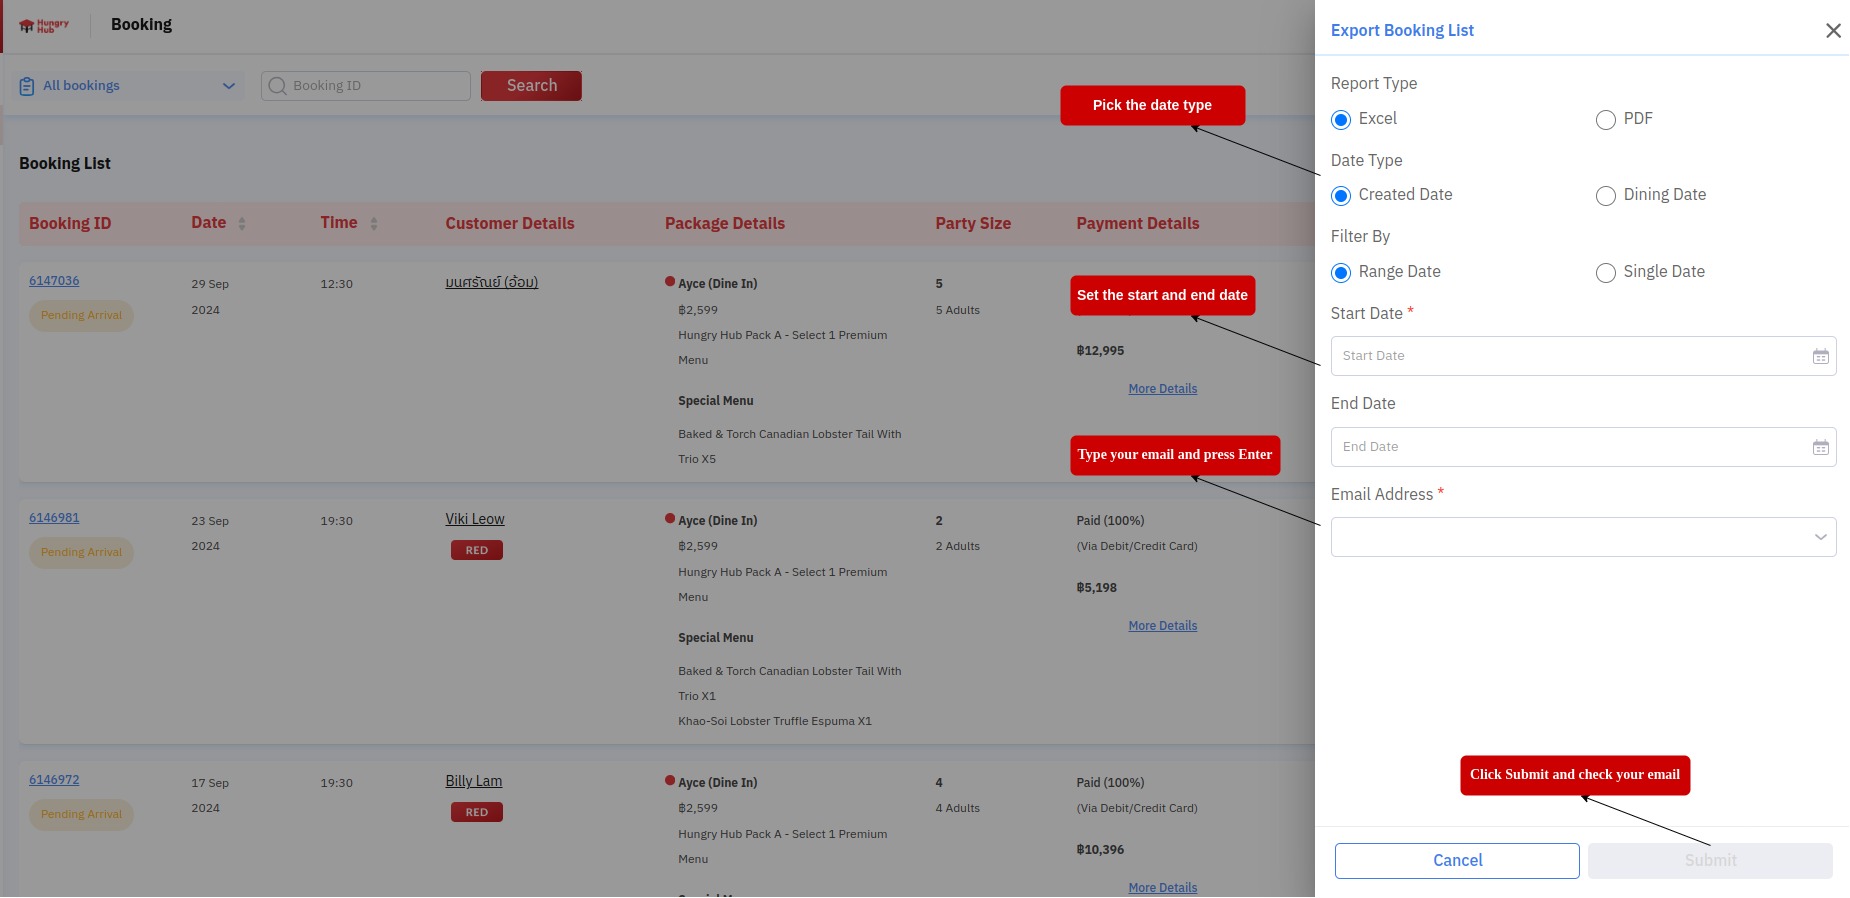
How to use Booking Filter
- Log into the dashboard
- Go to Booking menu
- Click
 button
 - Filter bookings by::
- Booking ID
- Booking Status
- Customer Name
- Customer Phone
- Start Time
- Party Size
- Adults & Kids
- Package Type
- Service Type
- Payment Status
- Specific Package
- Date
- Click Show Result to apply the filter
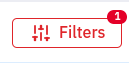
- The Filters button has an icon that shows you are using the filter feature and how many filters you applied. like this:
- To clear the filter, click Filters ➝ Clear All.
Booking List
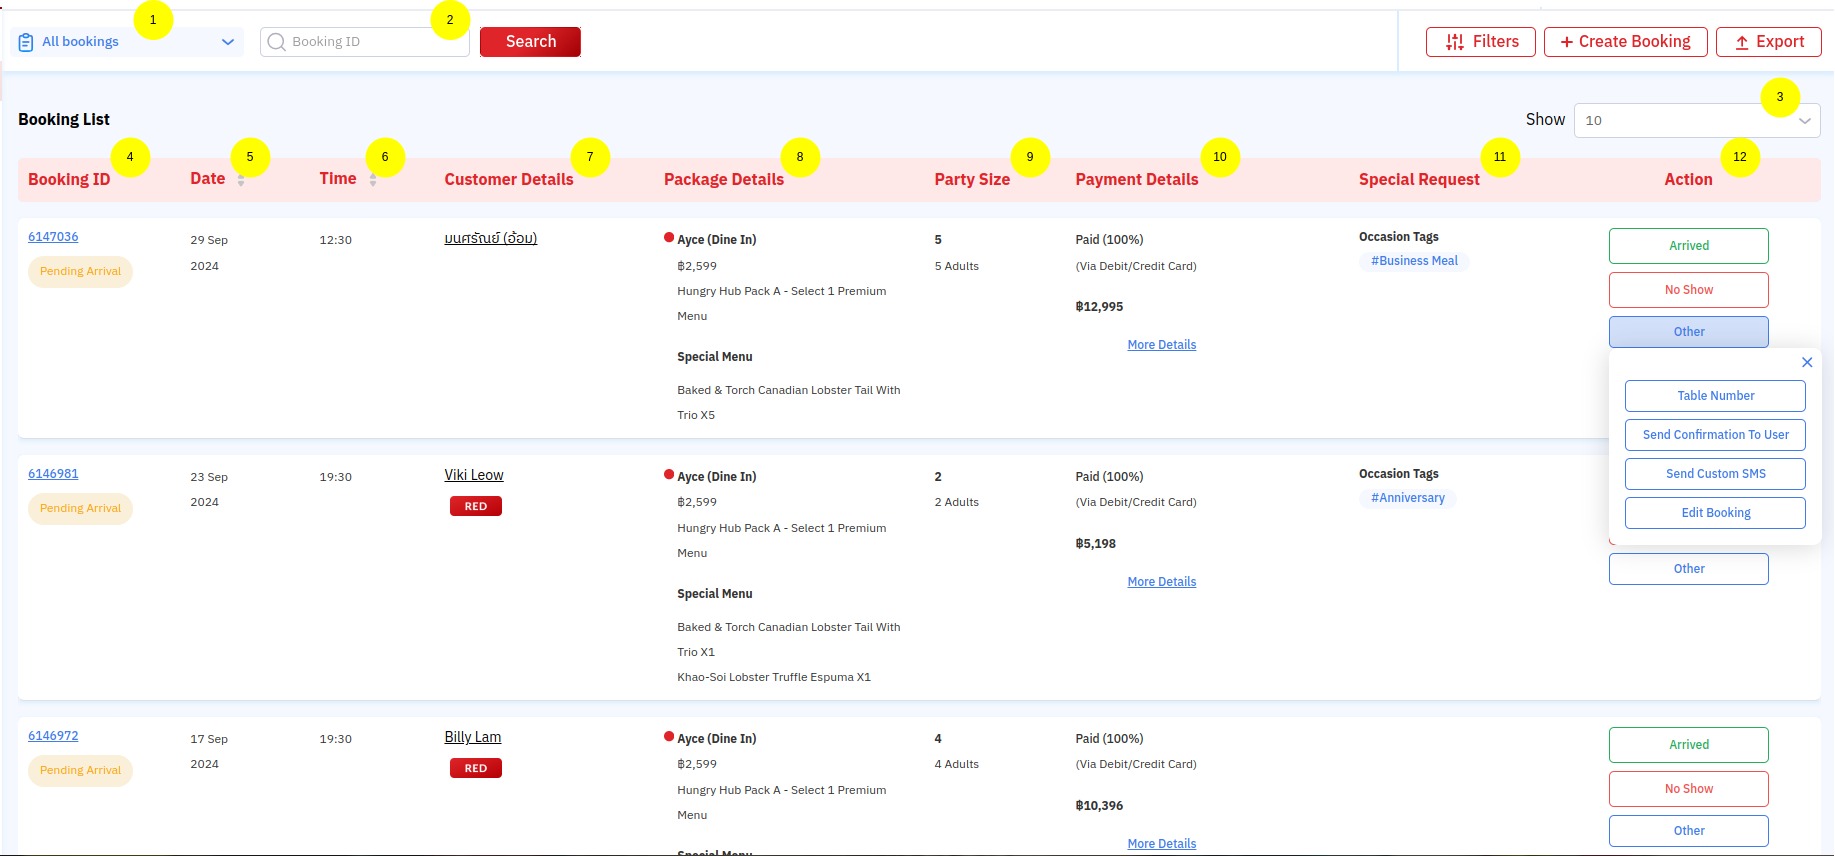 Once you’ve clicked on the Booking button, the system will show all the upcoming reservations.
-
All Bookings filter shows all bookings. Change the filter to see a specific booking status.
-
Booking ID search is to search specific booking.
-
Show is a table setting to display how many bookings on one page.
-
Booking ID click the Booking ID text to see the booking details. After customers have successfully made their booking, they will receive the booking ID via SMS and email. The booking ID will be required to be shown upon arriving at the restaurant. Status is the status of the booking – Will be shown as Pending Arrival, Canceled, No Show or Arrived. Booking Status will affect the commission of the restaurant.
-
Date of the reservation.
-
Time of the reservation.
-
Customer Details click on the customer name to view the customer’s detail and booking history. – Unregistered Customer, only name will be shown. – Registered Customer, name and customer loyalty level.
-
Package Details is the detail of the booking, package name and price per pax. – Adult will be marked as A and children will be marked as K. e.g. (3A + 2K) – More information on kid’s price check on Kid’s Price
-
Party Size is the number of people on the reservation.
-
Payment Details is the information about the reservation payment, click more details to see the detail payment summary.
- Pay on site reservation, will be mark with Due label with the total payment.
- Prepaid reservation, will show the percentage of the payment, payment method, and the total payment.
- Prepaid with deposit reservation, shows the percentage of payment, payment method and total payment, and the Due label for the remaining payment.
- Special Request is an additional request from the customer e.g. “I want a table next to the window” , “I want a birthday cake” , any information on the special request, the restaurant may contact the customer directly.
- Actions are functional buttons of the booking :
- Arrived ➝ Mark customer as arrived when the customer has come to honor the booking.
- No Show ➝ Mark customer as no show when the customer did not show up for the booking within 30 minutes after the booking time. (This only applies when the customer is uncontactable)
- Table Number ➝ To give the table number to the reservation.
- Send Confirmation To User ➝ To send confirmation manually (can only be used once)
- Send Custom SMS ➝ To manually send an SMS to the customer.
- Edit Booking ➝ To edit the reservation.