How to set Dynamic Pricings 2.0
Note: This is the Partner Portal workflow for Dynamic Pricings 2.0 — the rule-based, microservice-backed pricing system (powered by
hungryhub-team/pricing-engine). For the legacy per-package pricing workflow, see How to set Dynamic Pricings 1.0.
This tutorial provides a detailed walkthrough for setting up automated pricing adjustments within Partner Portal Dashboard to handle peak periods or special promotions.
1. Initiate the Pricing Rule
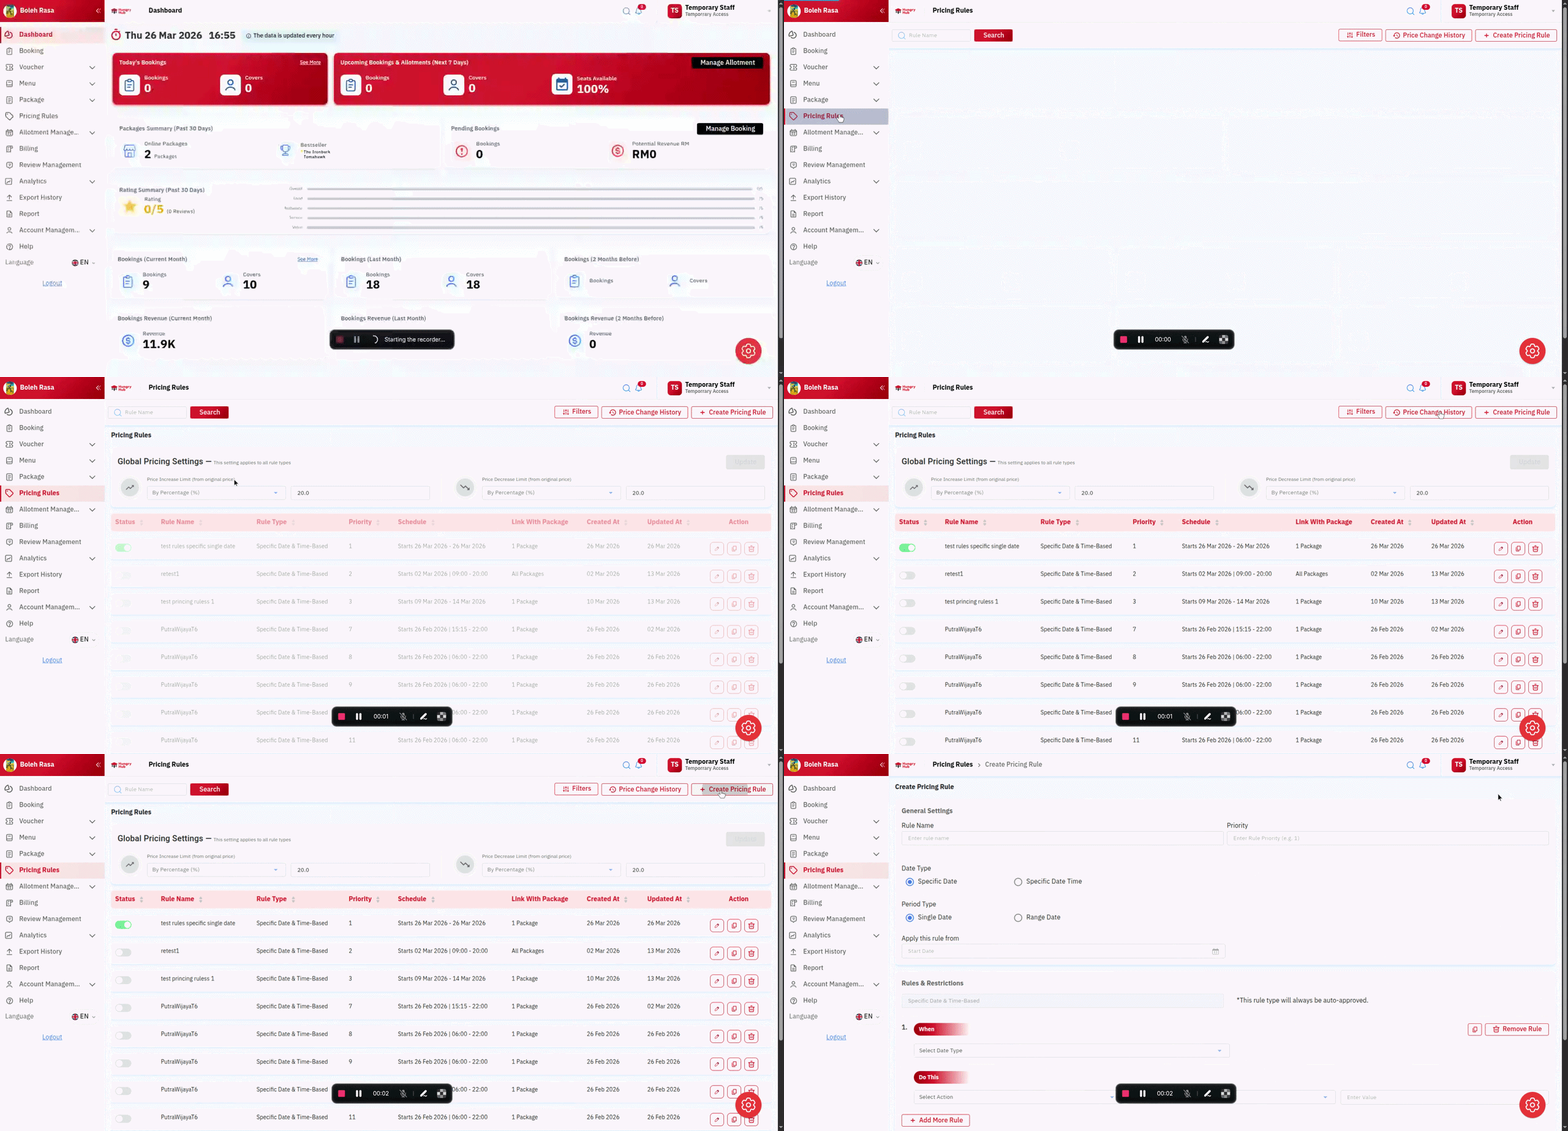
- Navigate to Rules: From the main dashboard sidebar, select the Pricing Rules tab to view your current configurations.
- Create New: Click the + Create Pricing Rule button located in the top right header.
2. General Settings & Scheduling
General Settings
-
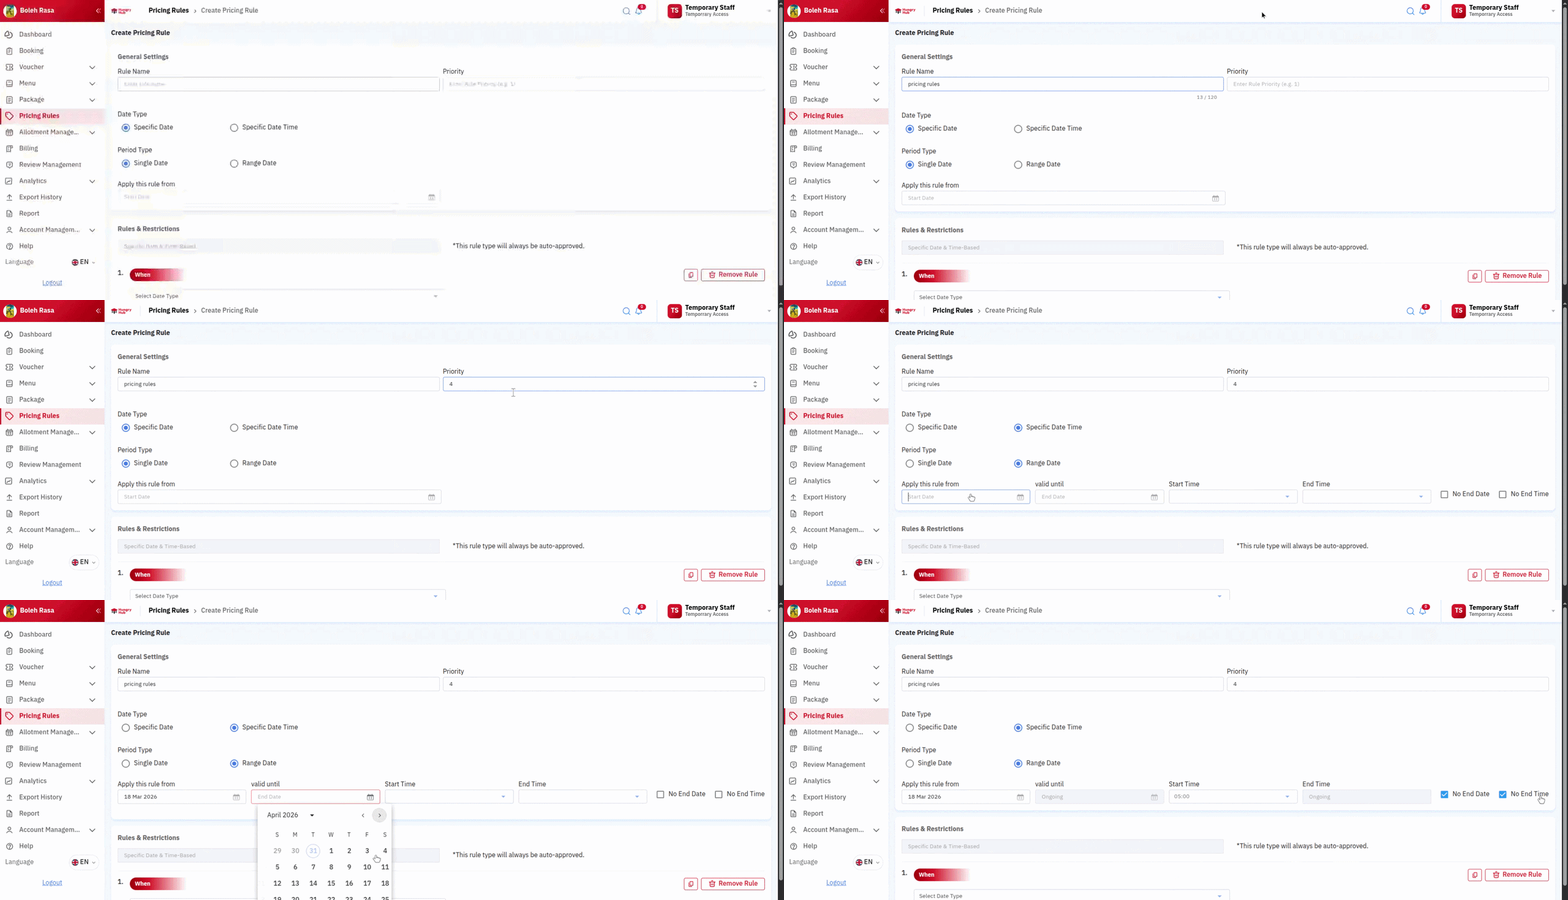
* Rule Name: Enter a unique, descriptive name for the rule.- Priority: Assign a numerical value (e.g., “2”). This determines which rule takes precedence if multiple rules overlap; higher priority values (or lower, depending on system logic) will override conflicting rules.
Define Period Scope
-
* **Date & Period Type:** Select the Date Type and Period Type from the dropdown menus. This determines whether the rule applies to specific timestamps or broader date ranges.
Set the Calendar Schedule
Use the date and time pickers to establish the rule’s lifecycle:
-
* **Active Range:** Define the Apply this rule from (Start Date) and Valid until (End Date) fields (e.g., March 9 to March 14, 2026).- Time Constraints: Set the specific Start Time and End Time for daily execution.
- Continuous Execution: To allow the rule to run indefinitely without an expiration date, check the No End Date and No End Time boxes.
3. Establishing Rule Logic (Conditions & Actions)
The core of the pricing rule uses “If/Then” logic to automate price changes based on your specific business requirements.
The Trigger (“When”)
Define the specific conditions that must be met for the price change to occur:
-
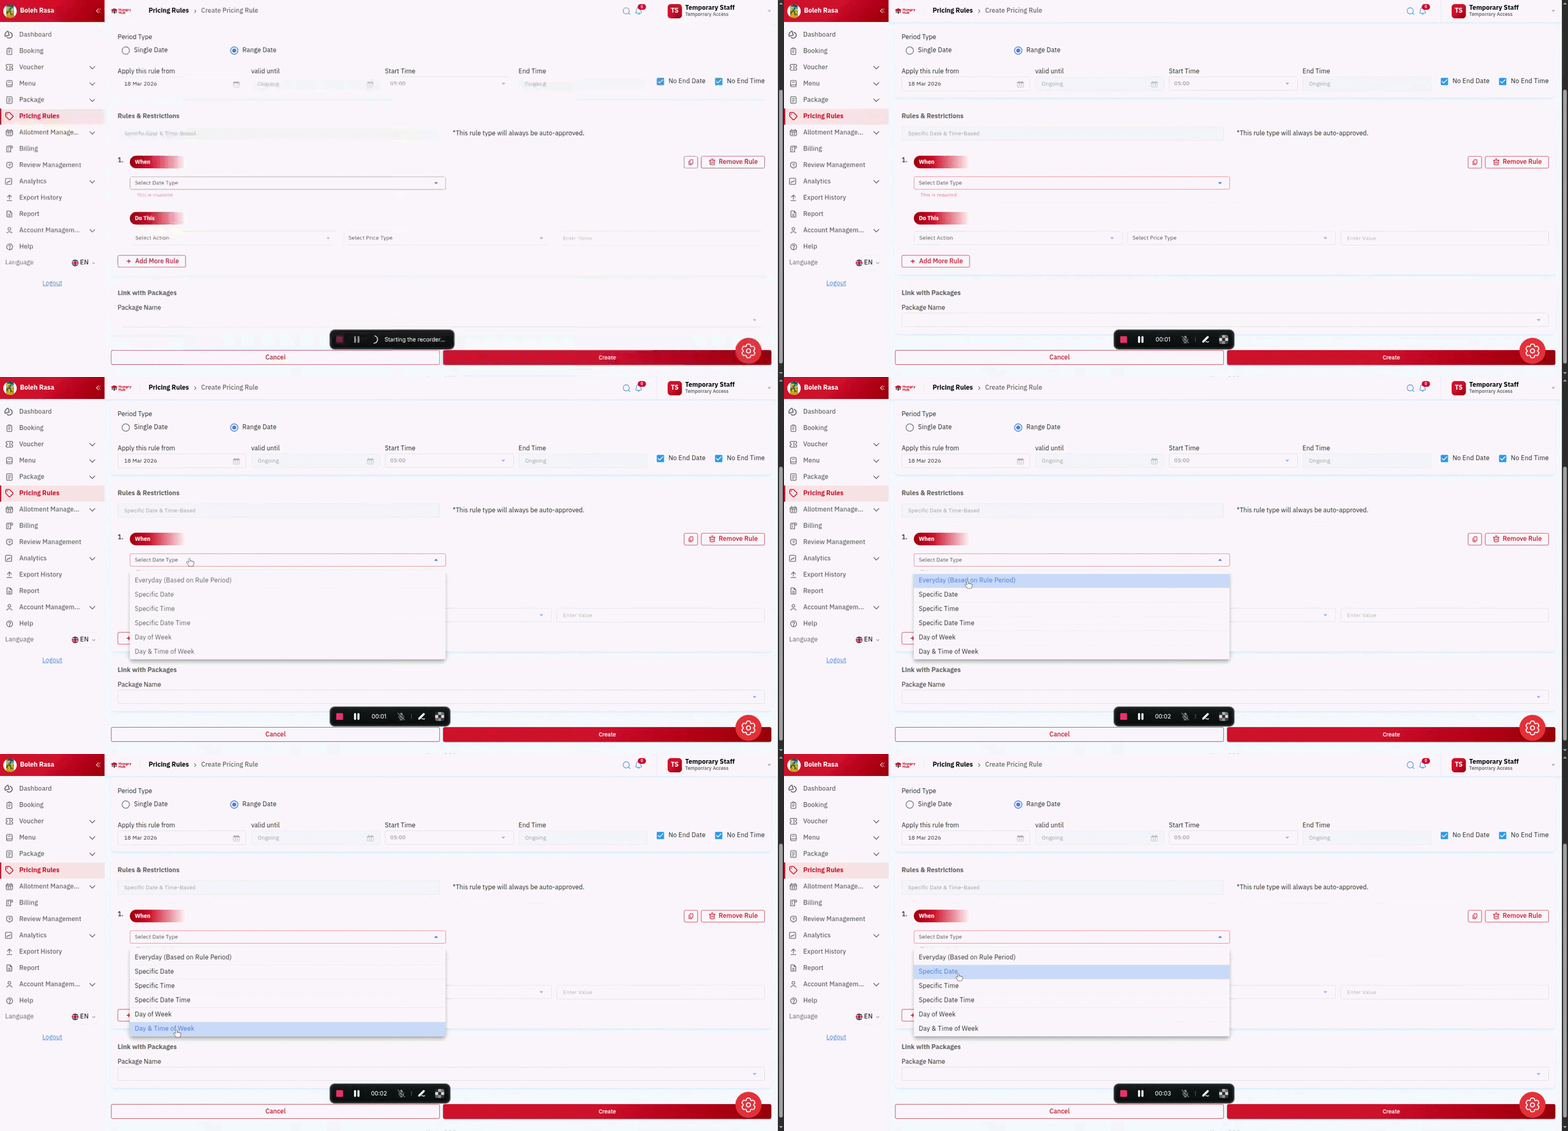
  *   **Select Frequency:** Choose the most appropriate time-based trigger from the following options:
  *   Everyday (Based on Rule Period): Applies the rule daily within the predefined date range.
  *   Specific Date / Specific Time: Triggers the rule at a precise moment.
  *   Specific Date Time: A combination of a calendar date and a clock time.
  *   Day of Week: Applies the rule on recurring days (e.g., every Monday).
  *   Date & Time of Week: Targets a specific window within a recurring week.
The Action (“Do This”)
Specify the pricing adjustment that will be executed once the trigger occurs:
-
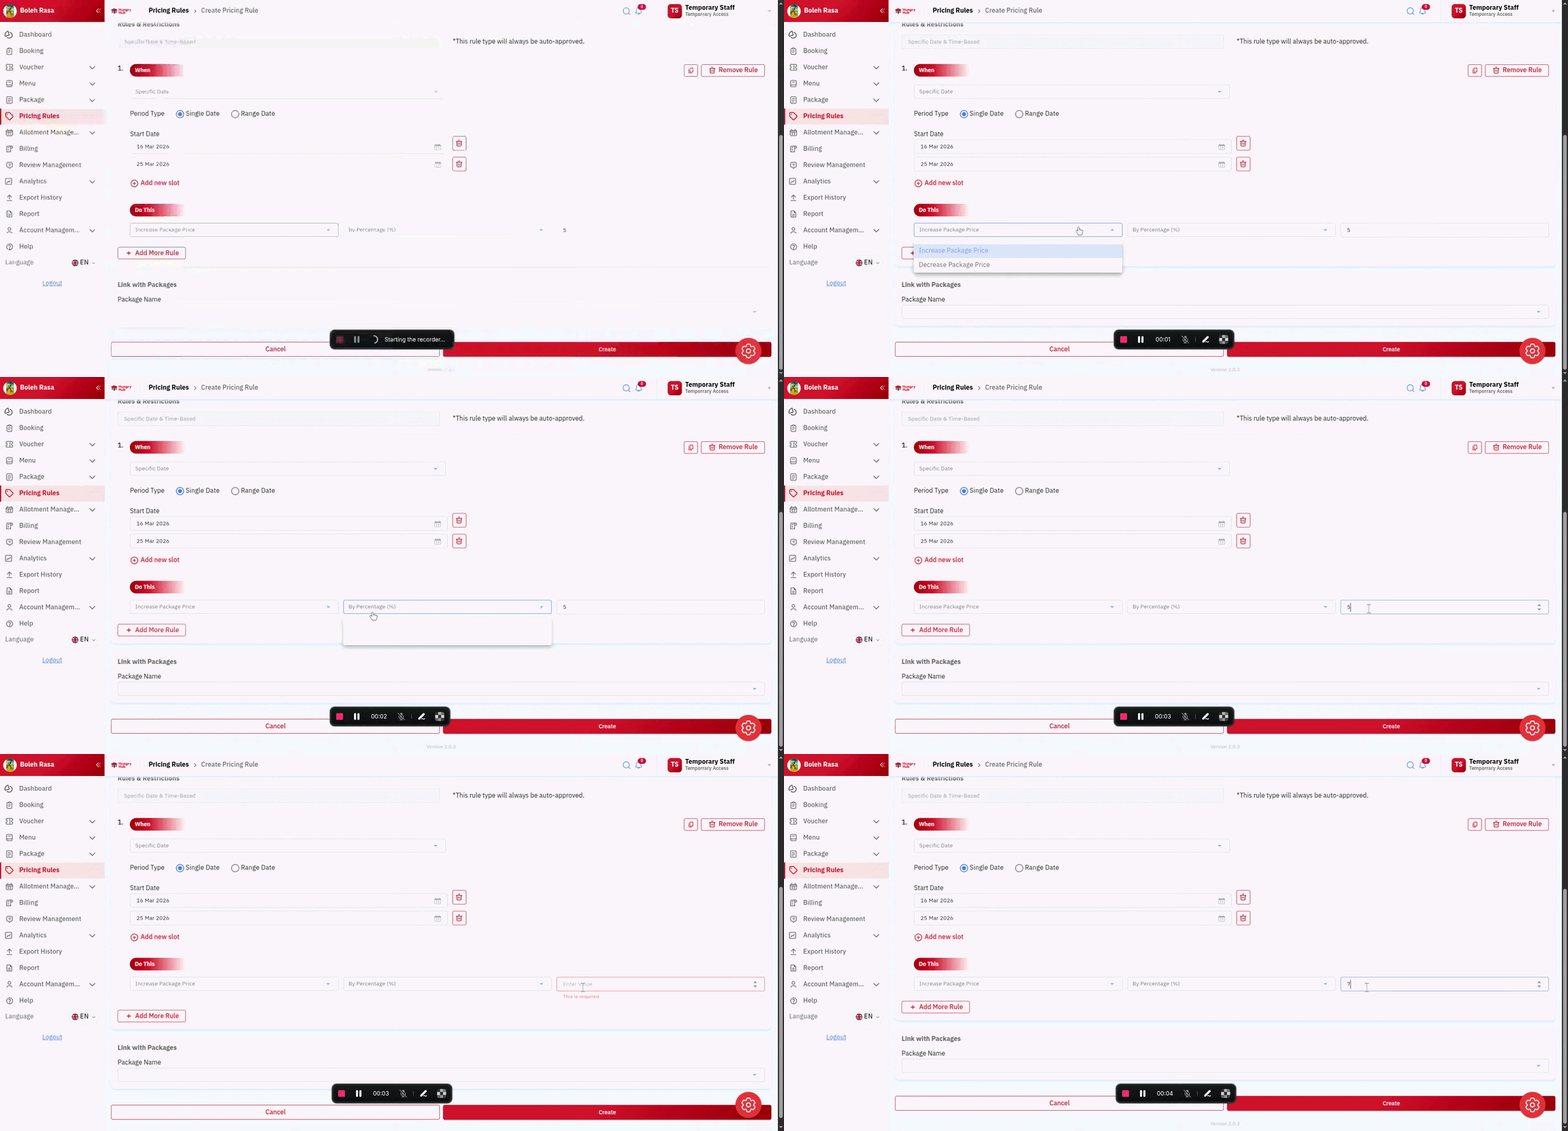
* **Choose the Adjustment:** Select Increase Package Price or Decrease Package Price from the dropdown menu.- Calculation Method: Select By Percentage (%) or By Fixed Amount (MYR).
- Input Value: Enter the numerical value for the adjustment (e.g., a 12% increase or a 100 MYR decrease).
Note: Fixed amount adjustments will automatically use the default currency configured for your restaurant.
Rule Management & Optimization
-
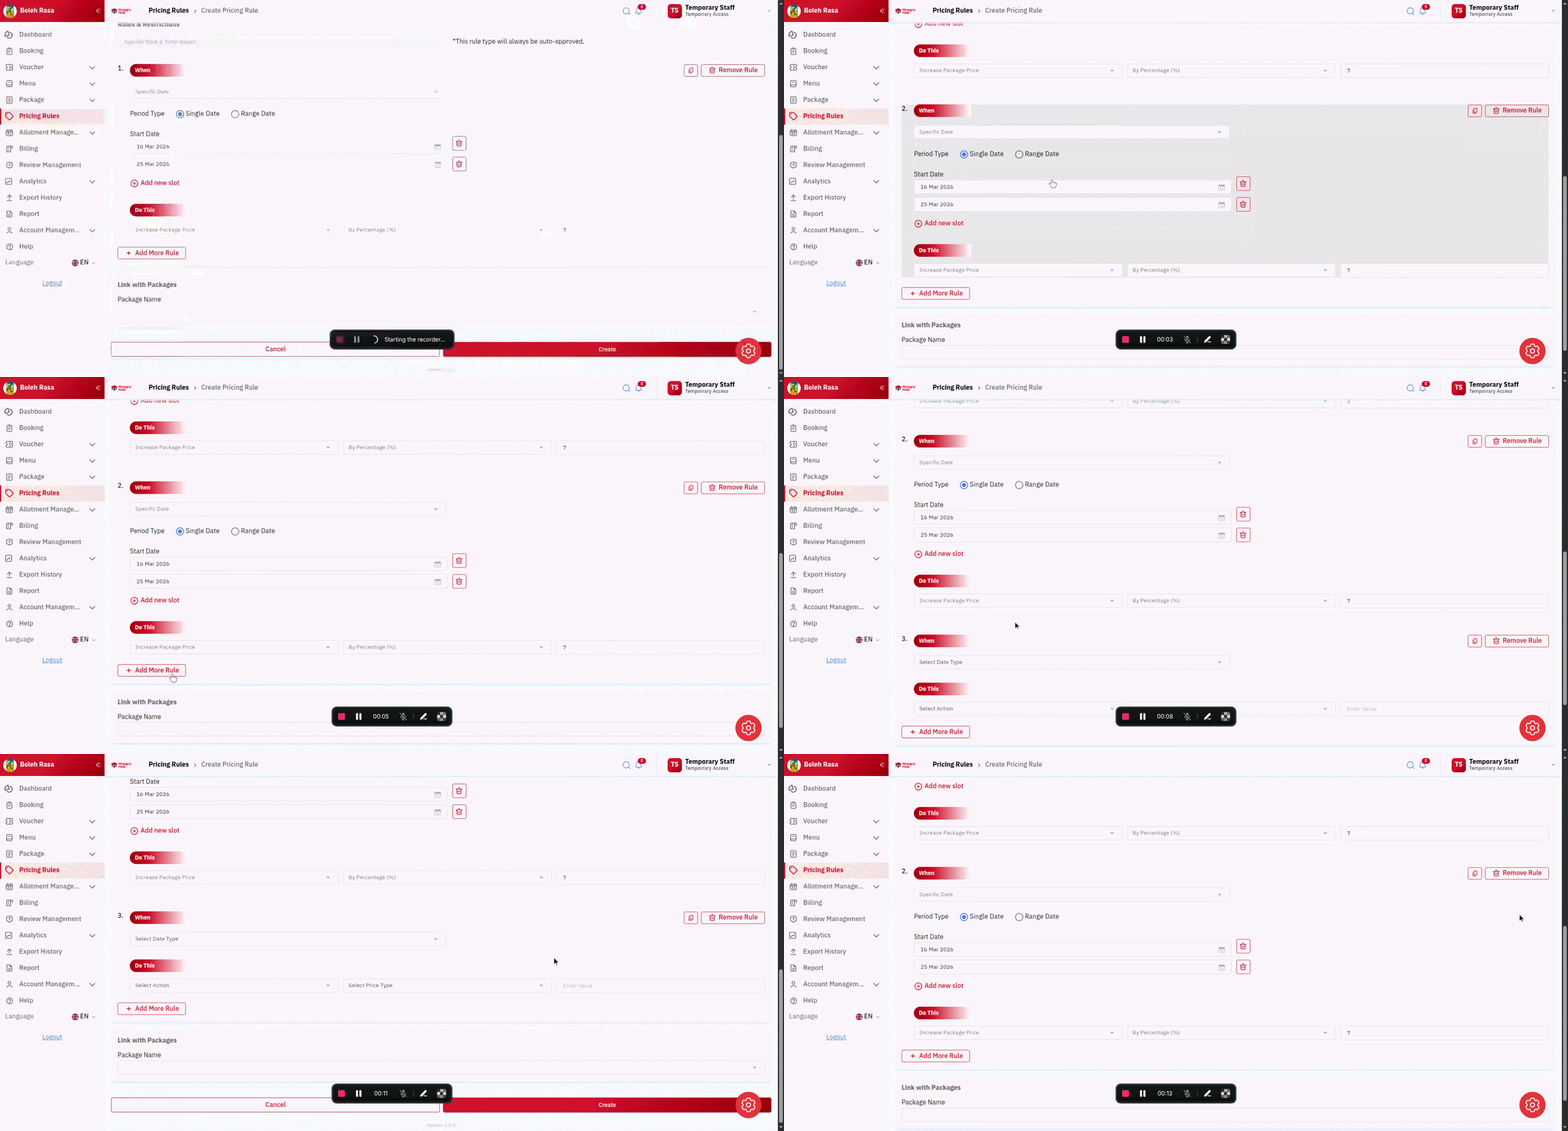
* **Add Multiple Rules:** Use the  button to create multiple triggers within the same rule period. This allows for complex scheduling, such as triggering one price at 16:30 and another at 20:00.- Duplicate Rule: To save time, use the
 button to clone an existing configuration. You can then modify the triggers or actions.
- Delete Rule: Use the
 button to permanently delete a rule from your active list.
- Duplicate Rule: To save time, use the
4. Demand & Capacity Rules
Demand & Capacity rules automatically change package prices based on real-time seat availability. They are evaluated against 15-minute inventory slots and are a good fit for peak-hour surcharges or low-occupancy discounts.
For the technical implementation details, see Demand & Capacity Rules — Implementation Notes.
4.1 Choose the Rule Type
When creating a new rule, select Demand & Capacity as the rule type. The rest of the form will switch to the capacity-based configuration.
4.2 Define the Capacity Condition
The condition answers the question: When should the price change based on seat availability?
| Setting | Description |
|---|---|
| Metric | Choose what to measure: Total Seats Booked, Total Seats Remaining, % Seats Booked, or % Seats Remaining. |
| Relation | Choose how to compare the metric against your threshold: greater than (>), greater than or equal (>=), less than (<), less than or equal (<=), equal (=), or between a min and max. |
| Threshold | Enter the value that triggers the rule. For percentage metrics, enter a number from 0–100. For absolute metrics, enter a seat count. |
Example:
- Metric = Total Seats Booked
- Relation = greater than or equal
- Threshold = 30
- This means the rule will fire when 30 or more seats are already booked in the rule’s time window for the selected date.
4.3 Set the Date/Time Eligibility Window
Demand & Capacity conditions also need a date/time window that decides when the rule is allowed to run. Configure the same date/time options as a normal rule:
- Date Type — e.g. Everyday, Specific Date, Day of Week, Specific Date & Time, etc.
- Start / End Date — when the rule is valid.
- Start / End Time — the daily time window during which the rule can apply.
- No End Date / No End Time — make the window open-ended.
A 15-minute API slot receives the adjusted price only when its start_time falls inside this window and the capacity threshold is met for that date.
4.4 Choose the Action
Set the price adjustment exactly like a normal rule:
- Increase Package Price or Decrease Package Price
- By Percentage (%) or By Fixed Amount
- Enter the adjustment value
4.5 Approval Mode
- Auto-approve: The adjusted prices go live as soon as the capacity condition matches.
- Require approval: Matching modifiers are created in a pending state. An admin must approve the rule before diners see the new prices.
5. Linking and Activation
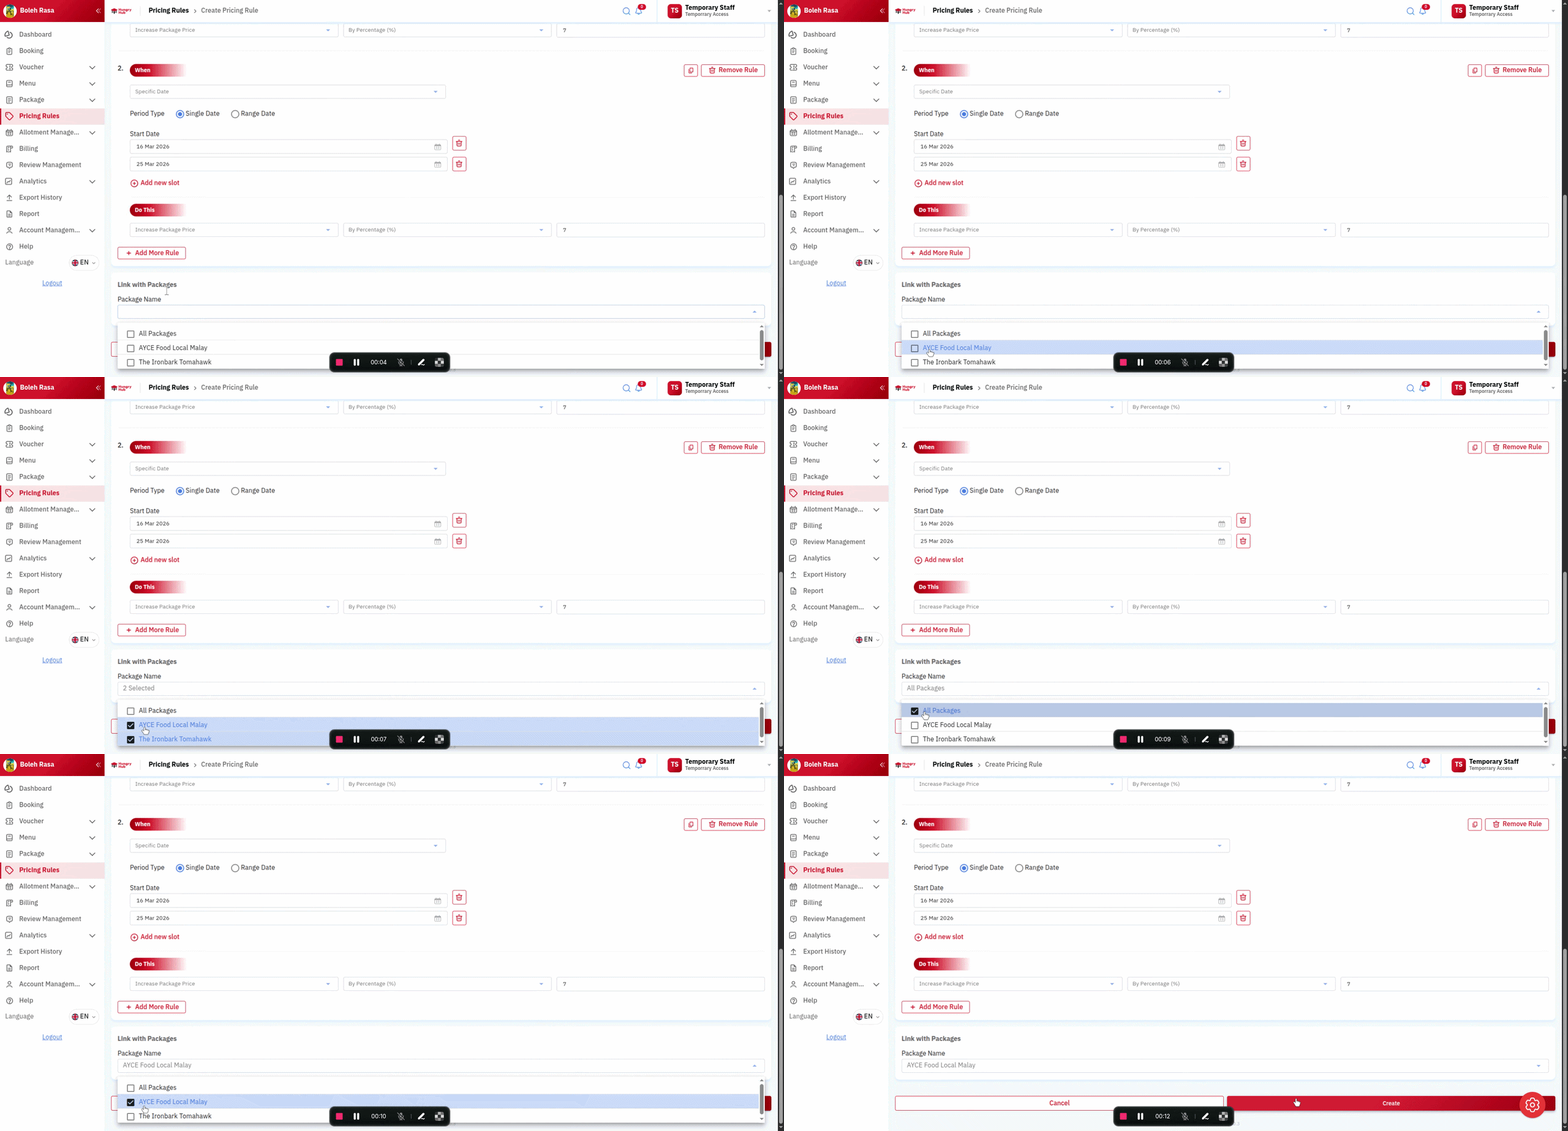
- Assign Packages: Under Link with Packages, select the specific item (e.g., “AYCE Food Local Malay”) that will be affected by this rule.
- Finalize: Click Create to save your settings.
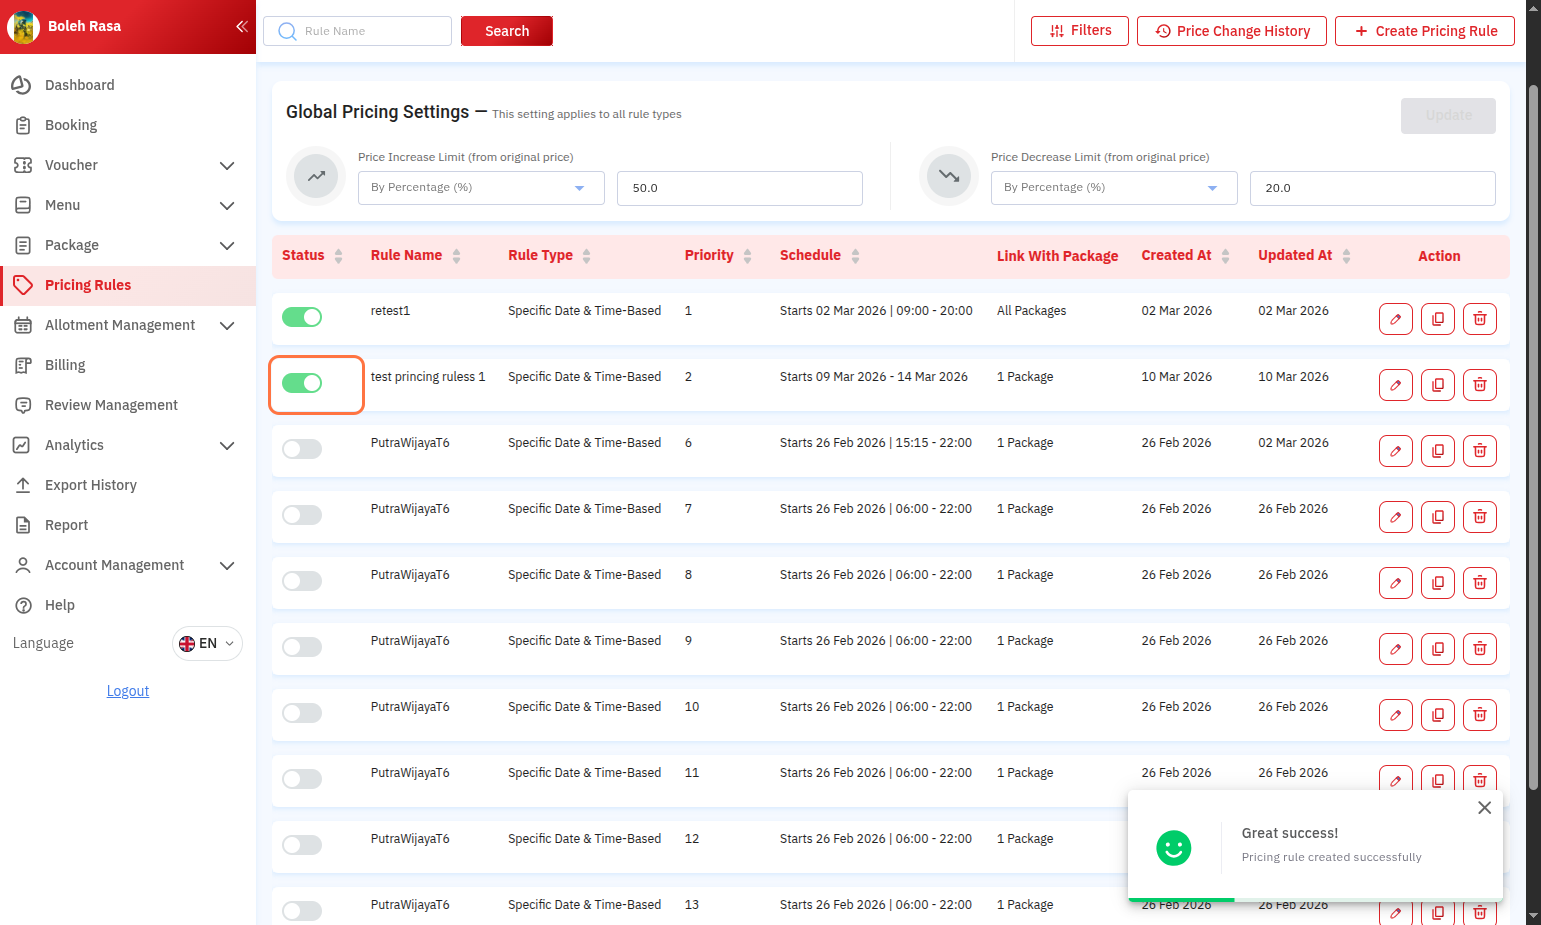
- Toggle Status: Ensure the rule is active by checking that the Status toggle is switched to the “on” position in your rules list.
6. Managing Global Pricing Guardrails
 To ensure automated rules don’t push prices beyond a reasonable limit, you can set “Global Pricing Settings” that apply to all rules.
- Set Limits: Define a Price Increase Limit (e.g., 20.0%) to cap how high any rule can raise the original price.
- Apply Changes: Click Update to save these global restrictions.