Self Check-In
Description / Background
Self check-in was introduced to address the issue of staff clicking which customer was arrive manually. To alleviate this, we established a self check-in system, we integrate this check-in system with Kiosque, so user can scan upon their arrival.
This feature will reduce the need for manual check-in processes, enhancing user experience and streamlining operations for both customers and the partners.
Glossary
Objectives
- Simplify the check-in process for users, eliminating the need for staff assistance.
- Improve user experience by reducing wait times and during check-in.
- Increase our partners operational efficiency by reducing manual check-in efforts.
- user can check in to restaurant online
- user can check in to restaurant x minutes before booking time
- user can get table number(if there's table number) when check in online
- admin can set the self - checkin link on Admin Dashboard ➝ Restaurants ➝ Self Check-In Setting
- user can check-in if the date and time was correct
example:
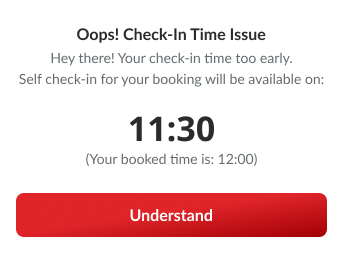
User make a reservation for 30 Nov 2023 12.00 and the self check-in setting was 30 minutes before booking time and 15 minutes after booking time. So user can check-in on 30 Nov 2023 from 11.30 to 12.15
- if user check-in too early they will get error message like this
- If user get other problem for self check-in they will get this error message

- self check-in from BE perspective Private (https://app.clickup.com/9003122396/docs/8ca1fpw-23185/8ca1fpw-27065)
- Admin can upload T&C Image
How to Self check-in
From Application / Website :
- Open Profile ➝ Upcoming Reservation ➝ Pick Self Check-in button
- User will redirected to self check-in page
- User can check in by inserting their Booking ID and email
- or Check-in by scanning their barcode
- If you wish to scan the barcode, you have two options:
- scan it using your camera
- or open the gallery and insert a screenshot of the barcode.
From Email :
- Open email booking confirmation
- Click button Self Check-in
- User will redirected to self check-in page
- User can check-in by inserting their BookingID and email
- or Check-in by scanning their barcode
- If you wish to scan the barcode, you have two options:
- scan it using your camera
- or open the gallery and insert a screenshot of the barcode.
From Modify Booking Page: (not ready yet)
- Open Profile ➝ Upcoming Reservation ➝ Modify
- Click button Self Check-in
- User will redirected to self check-in page
- User can check-in by inserting their BookingID and email
- or Check-in by scanning their barcode
- If you wish to scan the barcode, you have two options:
- scan it using your camera
- or open the gallery and insert a screenshot of the barcode.
How to set Self Check-in
- Open Admin Dashboard ➝ Restaurants ➝ Self Check-In Setting
- Click "Add New"

- It will add new row on table like this:

- For "URL (Slug)" you can get the restaurant slug from the URL on website like:
a. You want to add self check-in setting for The Prism Bangkok
b. Open the restaurant on website
c. Check the URL link https://web.hungryhub.com/restaurants/the-prism-bangkok?locale=en
d. On that url, the text after restaurants/ was the restaurant slug
e. So the slug was the-prism-bangkok
f. Insert that slug
g. If you want to make self check-in for restaurant group, the slug was the text after https://web.hungryhub.com/ like : https://web.hungryhub.com/laem-charoen-seafood-buffet-799?locale=en
h. So if that case the slug was laem-charoen-seafood-buffet-799
- For "Before Booking Time (Minutes)" you can enter how many minutes before the booking time the user will be allowed to check in.
Example:
If you insert 30, so user can check-in 30 minutes before the booking time.
- For "After Booking Time (Minutes)" you can enter how many minutes after the booking time the user will be allowed to check in.
Example:
If you insert 30, so user can check-in 30 minutes after the booking time.
- For "Logo Image" you can insert the restaurant logo, and it will show on self check-in page like this

- For "T&C Image" you can
- click Choose File button
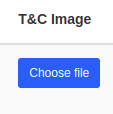
- pick the T&C Image and click save.
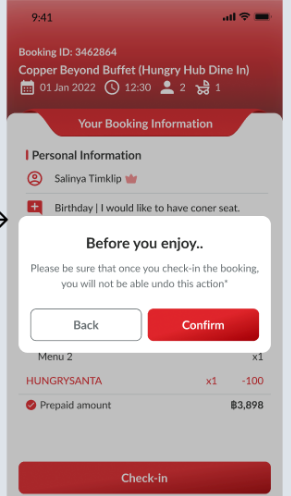
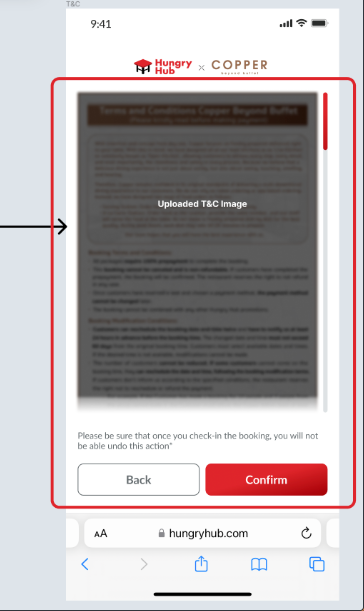
- It will replace the confirmation popup when user check-in.
- For "Require Table Number"
- For "Outlet" You can pick the restaurant that will use that Self Check-in link
- Click "Save"
- You can see that after saving it, it will generate "Full URL"
- The "Full URL" is the URL, which the user will use to self check-in.
Design
Client:
[
Customer Self-check in
Created with Figma
https://www.figma.com/file/K2aal08OSzbXAb9Aoy4r8y/Customer-Self-check-in?type=design&node-id=0%3A1&mode=design&t=w0F2ZJBOzuhgpgbJ-1
](https://www.figma.com/file/K2aal08OSzbXAb9Aoy4r8y/Customer-Self-check-in?type=design&node-id=0%3A1&mode=design&t=w0F2ZJBOzuhgpgbJ-1)
Admin:
[
Customer Self-check in
Created with Figma
https://www.figma.com/file/K2aal08OSzbXAb9Aoy4r8y/Customer-Self-check-in?type=design&node-id=0%3A1&mode=design&t=w0F2ZJBOzuhgpgbJ-1
](https://www.figma.com/file/K2aal08OSzbXAb9Aoy4r8y/Customer-Self-check-in?type=design&node-id=0%3A1&mode=design&t=w0F2ZJBOzuhgpgbJ-1)
PRD
Private (https://app.clickup.com/9003122396/docs/8ca1fpw-7922/8ca1fpw-26282)
What happens if the restaurant has a new restaurant, do they need to have a new check-in link?
Initially, customers usually book at Pizza A and check in at pizza-a without issues. However, when a new branch was created, a pizza-group was formed and Pizza A was relocated to it. Although pizza-a hasn't been removed, it has been replaced with Bakso B. As a result, customers who typically check in at pizza-a wonder why they can no longer do so. Well, it is impossible as Pizza A restaurant has relocated the check-in link. Therefore, individuals who have pre-booked at Pizza A must now check in at pizza-group.
In the Pizza group, does the user need to take any action to move the check-in? Will there be a notification, or will a new URL be generated?
If the previous URL still works, it should not be possible since it was generated for the old booking. However, for future bookings, the new URL in the email must be used to update it. Maybe the issue could be related to check-in.
New Updates on Feature
| NEW FEATURE | MODIFY SPRINT |
|---|---|
| ADD T&C IMAGE | SPRINT 33 |